Monday 29 June 2015

How do I change the name of a group I admin?

You can only change the name of a group you admin if it has fewer than 5,000 members. To change the name of your group:
  1. Go to the group and click  in the top right
  2. Select Edit Group Settings from the dropdown menu
  3. Change the group name and then click Save
All members of the group will receive a notification that the name has changed.
Note: We don’t allow admins to change a group’s name when the group reaches 5,000 members to prevent abuse. We do this because closed and public group names, members and group descriptions are visible to anyone and may be seen as part of someone's identity on Facebook.

Friday 26 June 2015

How to Add Your Own Image as Blog Background in the Template Designer


How to Add Your Own Image as Blog Background in the Template Designer

Add Your Own Image As Background in the Template Designer

The most special thing about Blogger-Blogspot is personalization and ease of use. People love to have a personal image as their blog background. You can see my previous tutorial which makes it fairly easy to add an image as blog background in the older Blogger-Blogspot templates (also called layouts). Now, you can design your very own templates with the new Template Designer. But you can't add your own image as background without knowing HTML and CSS. So, in this tutorial, I'll try to make it very simple to add your own image as blog background.

Things to Do in This Tutorial


So, we need to do 3 different things in this tutorial which are:

1- Select an image from your computer or web.
2- Upload your image on Blogger-Blogspot.
3- Add the uploaded image as blog background.

1- Select an Image From Your Computer or Web.


First of all you've to select an image either from web or your computer. If you like some image on the web then it is better to save that image on your computer. If you've a professional blog then go for a pattern (Download Patterns) as background otherwise personal bloggers might wanna add their personal image as blog background.

2- Upload Your Image on Blogger-Blogspot.


The most convenient way to upload an image on web is to upload it to your Blogger-Blogspot blog. Blogger provides each user 1gb free space so use it. Here is a tutorial to upload your images on Blogger:

How to Host Images on Blogger

After uploading your image on Blogger-Blogspot, make sure to copy the address/URL of your uploaded image because that will be used later.

3- Add the Uploaded Image as Blog Background.


I'm assuming that you've uploaded your image and you've the address/URL of your uploaded image. Now go to Design thenTemplate Designer. From the left column select Advancedand then chose Write CSS. You can click the following image for help:


In the box there, we can add our custom CSS code. So, you need to add the following code in that white box:

body { background: url(URL of Image you uploaded in step 2); background-color: none; }
.body-fauxcolumn-outer div { background: none !important; }


If you're using a pattern then the above code will work great. However, if you're using a big image then you need to take care of the alignment as well. The code for an image will be something like this:

body { background: url(URL of Image you uploaded in step 2) no-repeat scroll top left; background-color: none; }
.body-fauxcolumn-outer div { background: none !important; }


There are 4 things in the code above, let me introduce them to you.

1- no-repeat


It makes sure that the large image doesn't repeat itself. You can change it to repeat if you want to repeat your background image.

2- scroll


You might have noticed that the background image also moves when you scroll down your blog. If you want the background image to stay still in the background then you can change scrollto fixed.

3- top


Top is indicating the vertical positioning of the background image. You can change the vertical positioning to center orbottom.

4- left


Left is responsible for horizontal positioning of your background image. You can also change this value to center orright.

Final Thoughts


I've tried my best to make the HTML and CSS stuff easy for you guys. however, if you still feel any difficulty, feel free to leave me a comment. You can also refer to an official tutorialprovided by Google about adding custom CSS in Template Designer.

Tuesday 23 June 2015

How to Host HTML, JavaScript and CSS Files online Free

How to Host HTML, JavaScript and CSS Files online Free

How-to-Host-HTML-JavaScript-and-CSS-Files-online-Free
This is one of the major problem for bloggers because when we make any HTML or CSS design and want to upload it in our blog then we need any file hosting platform because blogger don’t have any feature to save your files in blog and if you host all of your files in template then your site take more time in loading, so we will need to find any other reliable and faster platform that host our HTML and CSS files and help our blog to load faster.
You can find many websites that host your HTML and CSS files but if you host your files on third party sites then its also effect on your site speed, so today we will going to share with you one amazing platform that name is Google Drive and you can host every type of file In your Google drive account with unlimited space and its more faster instead of any other platform.

Features of Hosting Files on Google Drive

  • Google Drive will provide you 5 GB free space on standard account and I think you can easily host your all files in 5 GB however if you need more space then you can also upgrade your account and got more space for hosting more files.
  • Google Drive will also provide you opportunity to save your personal files and if you want to share your files with anyone then simply make your files public.
  • You can upload multiple files at once and after it, if you want to make some changes in your HTML or CSS file then simply edit it and make your desired changes.
  • If you want to host some other files just like downloading files, then you can also upload these files on your Google drive account and share it with everyone.
  • Google Drive will also provide more security features instead of any other website because it’s owned by Google, so we don’t need to worry about our files security.

How to Host Files in Blogger using Google Drive?

We hope you can read above features and know next step is how we can host our HTML and CSS files on Google drive and use them in Blogger or anywhere else, where we want. Below we will discus each point with fully detail, just read all points deeply and host your files on Google drive.

Step#1: Save Your Files with your Desired Extension.

First of all we need to open one empty notepad file and save CSS or HTML coding with our desired extension, I mean to say if you want to upload CSS file then simply save your files with .css extension and if you want to upload any HTML file then save it with .html extension. You need to done whole process same below screenshot, where I am going to save one CSS file with .css extension.How-to-Host-HTML-CSS-files-in-Blogger1

Step#2: Hosting File on Google Drive.

When you save your file with your desired extension then next step is uploading it on Google Drive account. First of all go to Google Drive and log-in with your Gmail account. Now you can see Google drive homepage, where you need to make one folder. Click on “Create” and you can see drop down menu just click on “Folder” and after it one box will appear, simply write any name of folder and press “Create” and your folder will be created. You need to done whole process same below screenshot.
How-to-Host-HTML-CSS-files-in-Blogger2
Now open folder that you created in above step and simply click on upload icon and you can see two options files and folder. Simply Select “Files” same below screenshot.
How-to-Host-HTML-CSS-files-in-Blogger3
After it one window will be appear, where you need to select a file for upload in your Google Drive account. Simply select file and click on open, same below screenshot.
How-to-Host-HTML-CSS-files-in-Blogger4     
Now a one upload wizard will be appearing in right side of your screen. Its take few minutes to upload your file but its depend on your file size and your interned connection speed. When your file will be uploaded completely then click on Share button, same below screenshot.
How-to-Host-HTML-CSS-files-in-Blogger5
Now a one pop up will be appear, where you must need to need to make file public, so simple click on Change>> Public on the Web and after it click on “Save”. You can do whole process, same as below screenshot.
How-to-Host-HTML-CSS-files-in-Blogger6

Step#3: Getting a Hosting File Link.

Finally we need to got a link of file that we upload, so simple right click on file and you can see drop down menu, Now select “share” same below screenshot.
How-to-Host-HTML-CSS-files-in-Blogger7
Now a one box will appear, where you can see your file link, copy it and we can use it in next step.
How-to-Host-HTML-CSS-files-in-Blogger8

Make some Changes in URL.

This is the most important part of this tutorial so read it deeply. When you copy your file link then its look like https://drive.google.com/file/d/your-file-address and you just need to change it with this one https://googledrive.com/host/your-file-address.
Important: Make sure “your-file-address” is remaining same after the changing url.
How-to-Host-HTML-CSS-files-in-Blogger9
If you don’t understand then let me again explain it. For example, my file link is https://drive.google.com/file/d/0B5XHBEaFFoSYT1BDSl8zSHZLR2M that I upload on Google Drive and I just need to change it in https://googledrive.com/host/0B5XHBEaFFoSYT1BDSl8zSHZLR2M. Only one thing is remain same that is Green Highlighted Code.

Step#5: Adding Hosted File Link in Blogger

When you done above all steps successfully then next step is Adding hosted file link in blogger. So simply follow below steps.
Go to Your Blogger Dashboard>> Template >> Edit HTML.
Find <head> tag and just above it paste below coding.
<link href='https://googledrive.com/host/your-file-address' rel='stylesheet'/>
Replace “your-file-address” with your own file address that discussed in step 4. After it simply click on “Save Template” and you are done all things successfully.

Need Help?

We hope you can understand all steps, however if you got confused and want to ask anything then simply post your question in comment section and also join us on all social sites and don’t forget to subscribe us for getting upcoming tutorials directly to you inbox.
Have a Nice Day.

How to Create Tables in Blogger Posts

How to Create Tables in Blogger Posts

Create-Tables-in-Blogger-Posts
Sometimes we need to present our content in the shape of tables because if we going to share some specific projects with our site readers then we will easily add them in tables and our site visitors are easily understand It but unfortunately blogger don’t provide you any tool to create tables in blogger posts and if you want to create it then you need to have deep knowledge in HTML, CSS and some other programming languages but many of newbies don’t have knowledge about these languages, so we will need to use any simple and easy method to create table in blogger posts.

Create Table in Blogger Posts Without Coding.

There is a lot of ways that we can use and create our table by playing with different HTML and CSS codes but if we want to create table without using any coding then we need any software that helps us to create tables. You can use any software for creating table but we suggest you to use MS office word because it’s very simple and easy to use and we can create every type of table by using It. You can also change your table font and color styles in MS word. Below we will going to share with you one method that how you can use Microsoft word to creating table and after it add them in blogger posts.

How to Create Table in MS Word?

This is one of the simple and easy method to create table. You just need to download MS Office from anywhere or if you already have then simply open it and follow our steps. We will divide this tutorial in few steps that helps you to understand this method easily and in below screenshots we will use Microsoft office 2007, you can use any version of MS office for creating tables.
1. First of all Open MS Word and got to Insert>> Table and create table by choosing your desired rows and Columns.
Tables-in-Blogger-Posts
2. After it you need to write your desired content in Columns. You can also drag and drop columns and rows by using your mouse cursor.
3. Now after writing your content in table, we need to customize it little bit and make it more shiny and attractive. You just need to click on “Design” tab and you can see a list of some designs, just click any of them and apply on your table. You can also use some other styles by clicking on next and previous buttons.
Add-Tables-in-Blogger-Posts

How to Add Tables in Blogger Posts?

After creating table we need to add it in blogger.  There is two ways that we can use to add tables in blogger posts and below we will discuss both methods with fully detail.

Method#1: Adding Table By Simply Copy, Past.

This is one of the best and easy way to adding table in blogger. Here you don’t need to playing with any HTML or CSS coding, you just need to copy your table and paste it in blogger post. If you don’t know a method then follow below steps.
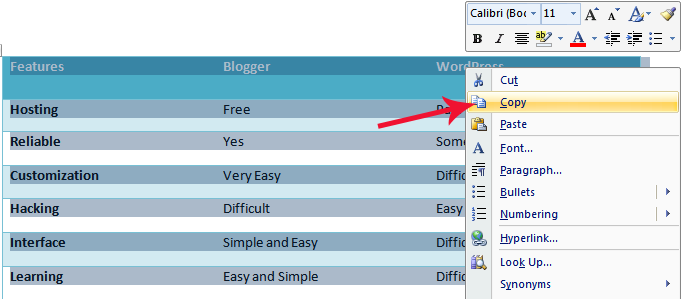
1. Simply Press (Ctrl+A) and select whole table and after it copy your table by using (Ctrl+C).
Create-Tables-in-MS-Word
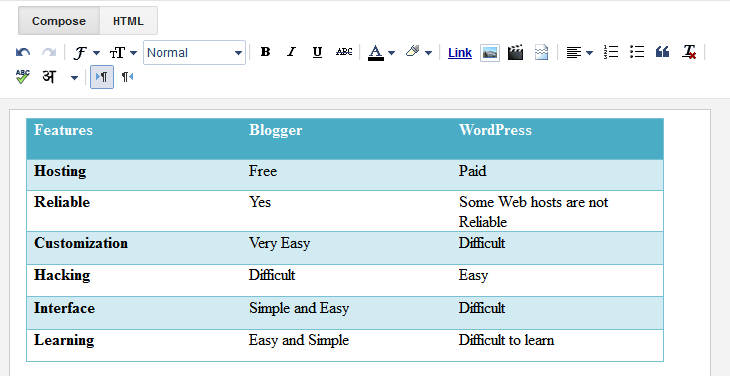
2. Now Go to Blogger Dashboard>> Create New Post and Paste you table.
Create-Tables-in-Blogger
That’s all, just write your desired content above or below table and publish it.

Method#2: Adding Table By Using HTML Coding.

If you want to add MS word table by using HTML coding then below we will also discussed each step of this method, just follow below steps and learn how you can add table by using HTML coding.
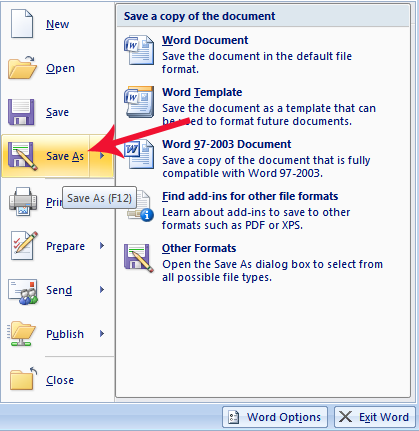
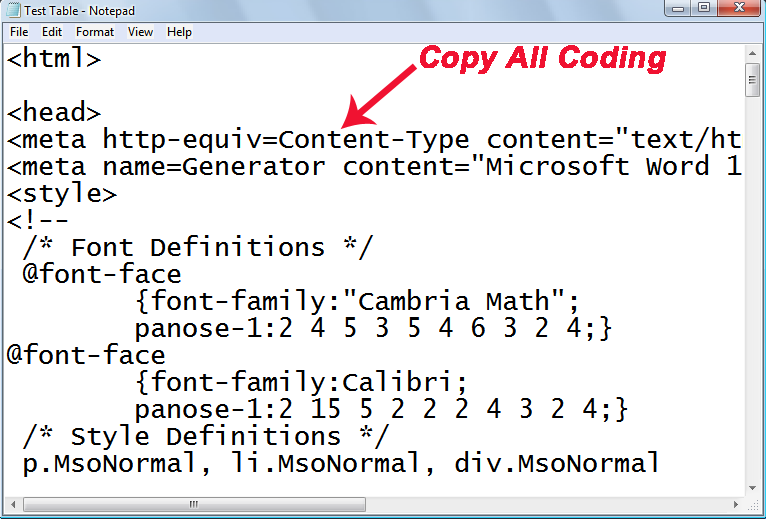
1. First of all Save your table by click on File>> Save as that you see in top left corner.
Create-Tables-in-MS-Word
2. Now saving box will appear where you need to write your file name and save as type. Simply write your desired file name with .html extension and select “Web Page, Filtered” from save as type. After it select your desired drive where you want to save this table and click on “Save”. (Tip: Save your file on desktop to access it easily).
Add-Tables-in-Blogger
4. After saving file simply right click on it and go to “Open With” and select “Notepad”.
Create-Tables-in-Blogger
5. Now you can see HTML Coding of your table, simply copy it and move for next steps.
Add-Tables-in-Blogger
6. Go to Blogger Dashboard>> Create New Post>> Move to HTML tab.
Create-Tables-in-Blogger
7. Now Paste your table coding in HTML tab and click on Preview or Publish post.

Need Help?

We hope this methods will help you to learn how to create and add table in blogger posts however if you face any problem or you have any question then feel free to ask in comment section and don’t forget to share this post with your friends and also subscribe us for getting upcoming tutorials straight to your inbox.
Best Wishes and Happy Blogging.

How to Download Specific Part of YouTube Videos

How to Download Specific Part of YouTube Videos

Download-Specific-Part-of-YouTube-Videos
YouTube is one of the biggest website that mostly peoples are visit to watch their desired videos and when they find any interesting or important video then he/she will be easily download it by using any simple method but what we do when we watch any long movie or presentation and want to download its specific part, can you download whole movie or presentation for just one part? No, because here we will going to share a very simple and easy method that help you to download your desired videos part in just few seconds. There is a lot of sites that provide you opportunity to convert youtube videos to any other format but you know after converting you can also download these videos any specific part. if you don’t have any idea then follow our method and learn how you can convert and download any specific part of youtube videos.

Download only Videos Part from YouTube and Daily motion.

You can also download your desired videos part from some other sites like Google Videos, Daily Motion, Vimeo, MySpace, Metacafe, My Video, SoundCloud and Veoh. Actually in this method you can use one website (clip converter) that will provide you many advanced features instead of any other site even you can set up your desired video quality, audio volume, video aspect ratio, Video and audio quality and many more. Below we will discus each part with fully detail, just go for below steps and learn a method to download a specific part of videos.
1. First of all go to www.clipconverter.cc
2. Now you can see one URL box, simply paste your desired video URL and click on continue.
Download-Specific-Part-of-Daily-Motion-Videos
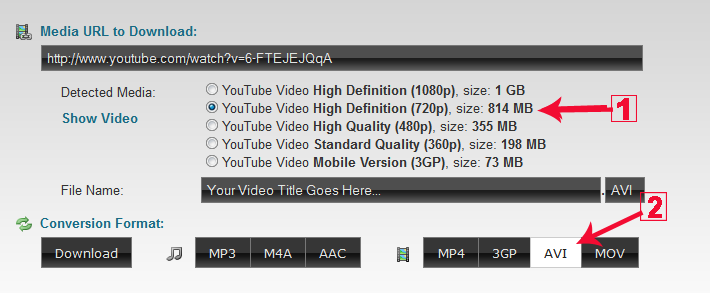
3. After it some drop down options will appear and Now here you can select your video quality and video format. We recommend to select AVI format.
Download-Specific-Part-of-Daily-Motion-Videos
4. When you click on any format button then “Conversion options” will appear.
5. Now this is your main point, simply uncheck two box “Start of Video” and “End of Video” and write your desired time, for example: Here I am going to download video part from00:10:00 to 00:20:00. You can also see below screenshot.
Download-Specific-Part-of-Youtube-Videos
6. Now after it simply click on “Start”.
7. It will take few minutes for converting videos to your desired format and after it downloading will be start.

Need Help?

We hope this method will help you to download specific part of your desired videos however if you face any problem or you have any question then feel free to ask in comment section and share this post with your friends and also don’t forget to subscribe us because you got daily some spicy tutorials straight to your inbox.

How to Download Facebook Videos Easily

There are tons of amazing videos that you can find on Facebook. And many of them are so much great and amazing that you want to save or download them in to your computer.


There are many third-party programs and browser extensions that allows you to download the Facebook videos. But the Facebook video downloading programs uses much of your system resources and also takes a lot of time. So, today I have created this tutorial in which I will show you that how you can download Facebook videos easily and quickly without using any third-party programs or browser extensions. There are many Facebook videos downloading websites but most of them doesn’t work. So, without wasting much of your valuable time, let’s get started with our tutorial.

Learn-How To Download Facebook Videos Easily

So, today I had found a website that allows you to download the Facebook videos easily and quickly and it also allows you to download Facebook videos in HD (High Definition) and as well as in SD (Standard Definition) quality. So, follow the below given steps to get started with the tutorial.
  • First of all, open up the Facebook website and login to your account and then go to that video which you want to save or download it to your computer.
  • Now, copy the Facebook link of the video that you want to download. It will be like this: https://www.facebook.com/video/video.php?v=10150148791745639
  • After that,open up the SaveVideo.me website in your browser.
  • Now, paste the Facebook video link in the green URL box.
  • Then, click on Download button.
  • Now, wait for few seconds and then you will see two options for downloading the video, one is in the HD format and the other in SD format.
  • After that, right-click on your desired video quality and then click on Save Link As…button.
  • Then, just click on Save button to download the Facebook video to your computer.
  • That’s it! You are done! Now, you have successfully downloaded a Facebook video to your computer.

Conclusion

So, this was all about how to download Facebook videos easily and quickly. I hope that now you will be able to quickly and easily download Facebook videos without installing any third-party programs or extensions in your browser. If you have any type of queries regarding this tutorial then do let us know, we will try our best to resolve them. And plus, if you’d like this tutorial then don’t forget to share this with your friends and social circles too.

© 2013 Programmers. All rights resevered. Designed by Templateism