

Sunday 12 June 2016

Friday 10 June 2016
Working with Time & Date - PHP Tutorial 4

Working with time and dates
In this lesson, we will try to look at the many different options for working with time and dates in PHP. We went through some very simple examples in the previous lesson mostly to show you what PHP is. In this lesson, we will take a closer look at the  date function.
Time and date functions
PHP provides a wide range of funtions in relation to time and date. In this lesson, we will look at the most important of these functions: date.
With different parameters, the date function can return the current date / time in many different formats. Some of the most useful parameters are:
- date("y")
- Returns the current year from a date - like: 18
- date("m")
- Returns the current month from a date - like: 06
- date("n")
- Returns the current month from a date without leading zeroes ( eg. "1" instead of "01") - like: 6
- date("F")
- Returns the current month name from a date - like: June
- date("d")
- Returns the current day of the month from a date - like: 18
- date("l")
- Returns the name of the current weekday from a date - like: Thursday
- date("w")
- Returns the current day of the week from a date - like: 3
- date("H")
- Returns the current hour from a time - like: 10
- date("i")
- Returns the current minute from a time - like: 29
- date("s")
- Returns the current second from a time - like: 52
This example illustrates the use of the date function:
 <html>
 <head>
 <title>Time and date in PHP</title>

 </head>
 <body>

 <?php

 echo "<p>Today it's " . date("l") . "</p>";

 ?>

 </body>
 </html>
The time is 1434616474
And now hold on... because now it becomes a little nerdy! The function time() returns the current time as the number of seconds since January 1, 1970, 12:00 PM, GMT.
 <html>
 <head>
 <title>time and date</title>
 </head>
 <body>

 <?php

 echo "<p>It's been exactly " . time() . " seconds since January 1, 1970, 12:00 PM, GMT </ p> ";

 ?>

 </body>
 </html>
Time expressed in the number of seconds since January 1, 1970, 12:00 PM GMT is a so-called "timestamp" (UNIX timestamp) and is quite useful when you work with dates/times in the future or the past.
By default, the date function uses the current timestamp (i.e. the current value of time(). But with an extra parameter you can specify a different time stamp and thus work with the future or the past. In the example below, we set the timestamp to 0 seconds from January 1, 1970 12:00 PM, GMT. Thereby we can check what day of week January 1, 1970 was.
 <html>
 <head>
 <title>time and date</title>
 </head>
 <body>

 <?php

 echo "<p>January 1, 1970 was a " . date("l",0) . "</p>";

 ?>

 </body>
 </html>
Unless you are a mathematical genius, it quickly becomes complicated to count the number of seconds since January 1, 1970 to a specific time in the future or past. But here you can get help from another nifty function: mktime, which does the calculations for you.
The syntax for mktime is (hour, minute, second, month, day, year). The example below converts the time of the first step on the Moon (July 21, 1969, 02:56):
 <html>
 <head>
 <title>time and date</title>
 </head>
 <body>

 <?php

 echo mktime (2,56,0,7,21,1969);

 ?>

 </body>
 </html>
Notice that it's returning a negative number as the date is earlier than January 1, 1970.
We can now put this together with the date function and find out which weekday this historic day took place.
 <html>
 <head>
 <title>time and date</title>
 </head>
 <body>

 <?php

 echo date("l", mktime(2,56,0,7,21,1969));

 ?>

 </body>
 </html>
What can you use it for?
All this may seem a bit theoretical at this stage. After all, what on earth can you use a function like time() for? More importantly, when will you learn something you can actually use on your pages?
The answer is that what you learn here are building blocks - the only limitations to what you can build are your creativity and imagination! I would venture to say that you have already learned more than you think. For example, do you think you can make a website with different background images each day of the week and that works in all browsers?
Sure you can! Look at this example:
 <html>
 <head>
 <title>time and date</title>
 </head>

 <body background="background_<?php echo date("w"); ?>.png">

 </body>
 </html>
The example above, with a dynamic background image, simply requires that you make seven images and name them background_1.png, background_2.png, background_3.png, etc.
If a user then enters your site on a Tuesday, the site will have background_2.png as background, and the next day, background_3.png. Easy and simple!
In the next lesson, you will be introduced to new building blocks that can be used to make loops and repetitions in your codes.
PHP is fun, don't you think?
Your first PHP Page - PHP Tutorial 3

Your first PHP page
From lesson 1 and 2, you now know a little about what PHP is, and you've installed (or have access to) a server. Now we are ready to begin making our first PHP page. We keep it simple and easy, but after you have gone through this lesson, you will understand much more about what PHP is and what you can do with it.
Basically, a PHP file is a text file with the extension .php which consists of:
- Text
- HTML tags
- PHP Scripts
You already know what text and HTML tags are. So let's look a little more at PHP scripts.
PHP Scripts
PHP Official Website has issued detailed documentation for PHP. Throughout the tutorial, there will be many links to the documentation. The goal is that you become accustomed to looking up and finding answers to your questions. PHP is so extensive that you can't to learn all facets in this tutorial. But PHP is not difficult! On the contrary, PHP is often very similar to plain English.
Let's get started with your first PHP page.
Example: Hello World!
Start by making an ordinary HTML document, but name the file page.php and save it in the root of the site:
- If you use XAMPP (see lesson 2), the path for the root is "c:\xampp\htdocs\page.php" on your computer (which is now a server).
- If you have a website on a host that supports PHP, you simply upload/ftp the file to your web host.
The HTML code should look like this:
<html>
 <head>
 <title>My first PHP page</title>

 </head>
 <body>

 </body>
 </html>
As you probably remember from lesson 1, PHP is all about writing commands to a server. So let's write a command to the server.
First, we need to tell the server when the PHP will start and end. In PHP you use the tags <?php and ?> to mark the start and end for the PHP codes that the server must execute (on most servers it will be suficient to use just <? as start tag, but <?php is the most correct to use the first time PHP is used.)
Now try to add the following simple code snippet to your HTML code:
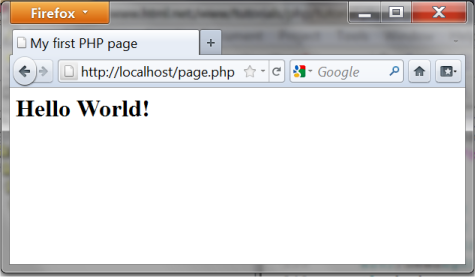
 <html>
 <head>
 <title>My first PHP page</title>
 </head>
 <body>

 <?php

 echo "<h1>Hello World!</h1>";

 ?>

 </body>
 </html>
When we look at the PHP document in a browser, it should look like this:
But it gets interesting when you look at the HTML code in the browser (by using "view source"):
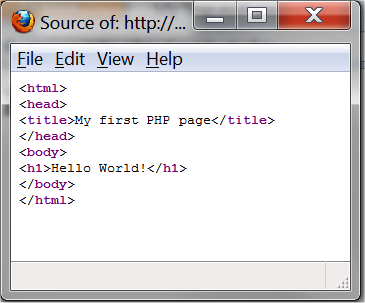
The PHP codes are gone! As you may remember from lesson 1, it is only the server that can see the PHP codes - the client (the browser) only sees the result!
Let's look at what happened. We asked the server to write <h1> Hello World!</h1>. In a more technical language, one would say that we used the string function echo to write a specified string to the client where the semicolon ends the command. But do not worry! In this tutorial, we try to keep the technical language at a minimum.
Our first example is obviously not particularly exciting. But just wait! From now on, it's only going to be more and more interesting. Let's look at another example.
Example: Now!
Let's make the server write something else. We could, for example, ask it to write the current date and time:
 <html>
 <head>
 <title>My first PHP page</title>

 </head>
 <body>

 <?php

 echo date("r");

 ?>

 </body>
 </html>
That will look like this in the browser:

And the corresponding HTML code:

Now things are getting interesting, right?
We make the server write the date and time when the PHP page is displayed. Note that if you refresh the page in the browser, a new time is written. The server writes the current date and time each time the page is sent to a client.
It is also important to note that the HTML code contains only the date - not the PHP codes. Therefore, the example is not affected by which browser is used. Actually, all functionalities that are made with server-side technologies always work in all browsers!
And again, notice the semicolon after the code line. It is a separator and very important to include - otherwise the script won't work.
In the example, we used date, which is a function that returns the current date and time on the server.
Let's try to extend the example by writing both a string and a function - separated by "." (a period) - it's done like this:
 <html>
 <head>
 <title>My first PHP document</title>
 </head>
 <body>

 <?php

 echo "<p>Current date and time: " . date("r") . "</p>";

 ?>

 </body>
 </html>
It will look like this in the browser:

And the corresponding HTML code:

In the next lesson, we will take a closer look at the date function and the different formats for date and time. So stay tuned.
Servers - PHP Tutorial 2

Servers
PHP is a server-side technology. Therefore, you need to have a server to run PHP. But it doesn't need to cost you anything to make this upgrade and there are several options for doing so.
Since you ultimately only need to choose one option, this lesson is divided into three parts. First comes a little introduction on the different options (just choose the one that suits you best). When your server is up and running, we'll pick up with Lesson 3 to make your first PHP page.
Option 1: Website on a hosted server
You can choose to have a website on a host that supports PHP.
- Test whether your host supports PHP
- If you don't already have a website on hosted server you can create a free account on 000webhost.com which supports PHP.
Option 2: Install PHP on your computer
It's no walk in the park to install PHP on your computer. This option is only recommend for experienced computer users, but it can obviously be done. Here are links to downloads and installation guides from the Official Website of PHP:
Option 3: XAMPP
XAMPP is a program that makes it easy and possible for us ordinary folks to run the PHP directly on our computer without having to install PHP on our own.
What is PHP - PHP Tutorial 1

What is PHP
Whenever anyone is learning PHP, the most common questions that first come up are: What is PHP? And how does it work?
It is precisely these questions we will look at in this lesson. It's a big help to understand such basics related to PHP before you start developing you own PHP pages. Such basic understanding will increase the speed of learning significantly.
So, let's get started!
What is PHP?
PHP was originally an acronym for Personal Home Pages, but is now a recursive acronym for PHP Hypertext Preprocessor.
PHP was originally developed by the Danish Greenlander Rasmus Lerdorf, and was subsequently developed as open source. PHP is not a proper web standard - but an open-source technology. PHP is neither real programming language - but PHP lets you use so-called scripting in your documents.
To describe what a PHP page is, you could say that it is a file with the extension .php that contains a combination of HTML tags and scripts that run on a web server.
How does PHP work?
The best way to explain how PHP works is by comparing it with standard HTML. Imagine you type the address of an HTML document (e.g. http://www.mysite.com/page.htm) in the address line of the browser. This way you request an HTML page. It could be illustrated like this:
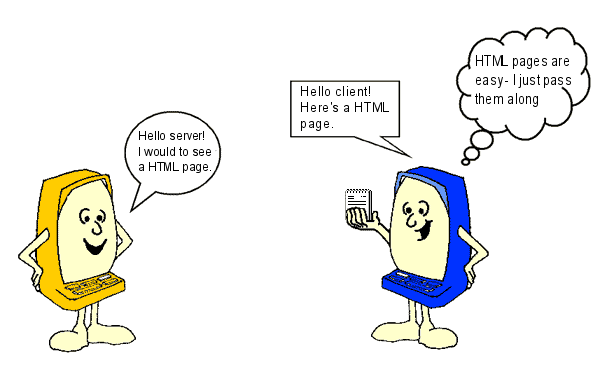
As you can see, the server simply sends an HTML file to the client. But if you instead type http://www.mysite.com/page.php - and thus request an PHP page - the server is put to work:
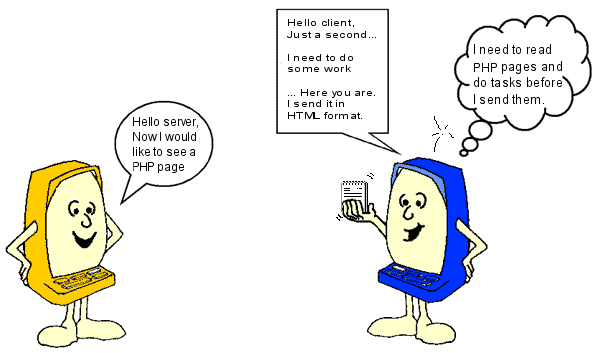
The server first reads the PHP file carefully to see if there are any tasks that need to be executed. Only when the server has done what it is supposed to do, the result is then sent to the client. It is important to understand that the client only sees the result of the server's work, not the actual instructions.
This means that if you click "view source" on a PHP page, you do not see the PHP codes - only basic HTML tags. Therefore, you cannot see how a PHP page is made by using "view source". You have to learn PHP in other ways, for example, by reading this tutorial.
What you learn in this tutorial is to write commands to a server!
So, the first thing you need to get a hold of is... a server! But don't worry - you don't need to buy a new computer. You just need to install some software on your computer that makes it function as a server. Another option is to have a website on a hosted server that supports PHP. Then you just need to be online while coding.
The next lesson is about how to get your computer to act as a server. So stay updated till the next lesson.
Are you heading to make your content attractive? Do you want to increase the readability of your content? If your answer to these questions is yes, then you may follow this article of mine. As today I am going to share some of the unexpected tips which will help you to make your content attractive and will help you to increase your readability.
The content of any site or blog is one of the prime things which is required for the success of it as content is the key aspect that gathers users around it. Every blogger want to make their content attractive and look good so that they can increase the blog readability.

The Content is considered as the king in blogging, but you must mold and present it in unique way. Since, the appearance is going to compel the readers that what actually exists in your content. So, here thing is proved that you need to work on the appearance of your content too which can help you to make it attractive and can get you more readers.
I have shared some of the really creative tips for you guys which you may apply to get the solution of your queries and can start making your content more attractive for your readers.
Make your Content Attractive by using these Tips
So, here are the tips which you are supposed to follow for making your content attractive for your readers. Once you’ve applied these tricks then you’ll definitely record the change in readability and response from your readers.
#1. Provide Unique Content
The most important and basic thing is providing the unique content on your blog. You must not copy anyone’s else articles on your blog as readers are the best judge and then can easily judge the content is copied or not and in that way you’ll lose your credibility.
So, if you want to survive in blogging world and are really interested to provide something attractive for your readers then start with providing something unique. Believe me that once you’ll start sharing unique content on your blog then you’ll see the great respect and response from your readers for sure.
#2. Analyze your Audience
Another most important tip which you must follow is analyzing your audience. I have seen many bloggers who write for themselves, but in blogging you need to write for others. You need to write what your readers want, not you.
And, for that you must analyze your audience and ask them what they want. Now, you must be thinking that “how to ask them?” So, you may use following platform for interacting with your readers and ask them about their interests.
- Social Media (Facebook, Twitter, Google Plus etc.)
- Community Blogs
- Ask for Feedback
- Use Your Comment Box
#3. Write on Controversies
When I say controversies that means I am suggesting you to write on something catchy and trendy. You must go with trends and see that what people are liking and what you should share. It really helps. You may go for keyword research and other tools to search for controversies.
Furthermore, social media sites can also help you to find out something trendy. You only need to go for little research and then design your content according to that controversy and it’ll work for sure. So, start hitting controversies.
#4. Write in Talkative Manner
You might have seen many pro bloggers and writers who write their content as if they are talking to us. It is actually a trick which almost every professional writer applies. This can help you to make your content attractive for sure.
When you write your content in conversational or talkative manner then it makes your reader comfortable and the reader get connected with your content. So, start applying this tip and see the change.
#5. Proofread Content and Avoid Errors
Errors are really annoying, especially when your reader experience them while reading your content. Many newbies directly publish their article after finishing it up they don’t go for proofreading and that is the point where they are going wrong.
Everybody makes mistake while writing their content in first go, so, you must proofread your content before making it live for your readers so that you readers may not experience any kind of errors in their reading. I know that proofreading can be time consuming.
But, you don’t need to worry about it now as there are many proofreading services which are working for you and I have listed two of them below. You may choose best professional proofreading service of your choice.
#6. Add Attractive and Related Images and Visuals
The garnishing of images is adding some attractive yet related images or visuals to your content. Content looks dull without images no matter how good you have written; if there is no image or visual graphics with it, it looks incomplete.
So, always add some quality, attractive images or visuals in your content but remember don’t overdo it. If you’ll add too many images then it’ll hide the real beauty of your content, make it moderate and use only relevant visuals to make it look attractive not to speak.
Conclusion
So, these were some tips from my side, I am sure that you are going to get your solution from these. If you have any questions to ask related to this guide then lend them in comment box. I shall get back to your questions as soon as possible.
Was it helpful? If it was, then do praise us by your shares and likes. Your share may help any of your friends out there, who is searching for the same stuffs.
Top 5 Best Tips for Creative Content Writing
Do you want to write creative and catchy content? Are you heading to introduce creativity in your articles? if Yes, then I am going share some tips which will definitely help you to write catchy and creative content on your blog.
Content is the King and It is the most important factor of blog and every blogger take it as the prime important factor of their blog. So, you need maintain the credibility of it as well. You only need to follow these tips and the rest work will be done automatically.


Content is the King and It is the most important factor of blog and every blogger take it as the prime important factor of their blog. So, you need maintain the credibility of it as well. You only need to follow these tips and the rest work will be done automatically.
These tips will help you to connect your audience more professionally and you’ll be having more readability. The most difficult job is building and maintaining the interest of readers in your content and many bloggers fail here. Therefore, I am sharing this trick which will help you to overcome this situation for your side.
Top 5 Tips to Write Creative Content
So, here are the tips which you need to follow in order to create and write creative and catchy content, a content which will make your readers stick to your website.
1- Go Unique!

The most important thing in blogging is going uniqueness. You should write on little off beat topics in order to get the attention of many users. It looks as an experiment but it will work for sure.
When you share something unique on your blog then it get more exposure and love from the users as uniqueness is always praised in blogging. We know that in every particular niche there is a great competition and nobody can deny it.
Your content must be same with one another but try to mold your structure in such way that it speak out for you. That is what uniqueness is all about. Share the same central idea but try to present in unique way.
2- Use Images, Infographics and Videos
Another trick which you should apply is adding media files in your content. It flourishes your content by complementing your words and ideas. You must use relevant images in your content and infographics or videos if necessary.
Here I would add one more tip that if you are getting images from external sources then you must put the credit link along with your image in order to support the real owner of the image and save your content from any plagiarism issue.
3- Go with Trends!

Here you need to be little analytical. You must research well before writing any article. First search out that what actually is trending in your particular niche and then share your content. It will automatically build creativity in your article.
So, always try to write on topics which are more trending. It will help you to bring great exposure for your written content and you’ll be reorganized by many new readers.
4- Write in Natural Way – Give Human Touch!

The most important thing which I should share with you. I have seen many writers who write in robotic manner, means that write as if they are planned to writer from “This to That” and that is awful! And, being a reader I really don’t like such kind of writers.
If you want to create creative content for your blogs and want to become a famous writer then you should learn to write in a natural way. You must write in conversational manner as if you are directly talking to your readers; it makes them feel comfortable.
You need to give a human touch and you must learn to make your readers comfortable with your content and that is only possible by writing with human touch. Learn that technique it will help you for sure!
5- Recheck Before Publishing

The last tip which I would like to give you guys for creative content writing is rechecking. Everybody makes mistakes while writing and to overcome this you must recheck your content before making it live for your readers.
It is good to be creative but if your creativity will be full of errors and mistakes then it will confuse your readers rather than impressing them. So, always go for proofreading technique before publishing your article. It will help you out to remove different sort of errors from your content and to flourishes its creativity.
Conclusion
These were some tips from my side which could help you write creative content. If you have any questions to ask, related to this article then do let me know. I shall get back to your queries as soon as possible.
Was it interesting? If Yes, then don’t forget to share this with your other friends and circle too. You may never know that your share may be proven helpful for many of the users out there. So, keep sharing and liking our content over social media.
Subscribe to:
Posts (Atom)
 About
About Tags
Tags Popular


