

Blogger is available in 50 Languages. With 75% of the Traffic coming from outside the USA.
And Blogger Users Like to Write. Over half a Trillion words have been written on Blogger. and That's more than 5.3 Novels  . And Users are writing 250,000 New Words a Minute. That's almost 500 Novels a Day .

Well in this blogger Course, You first Learn to Create a Blogger blog using your Gmail Account. So Lets see a Overview of it.
How to Create a Blog:
- Just Go to www.blogger.com
- And sign in with your Google account
- Now when you singed in with you Google account. You will see a page as shown in the image below.

- Just Click on New Blog button on the top left.

- A pop-up will appear and you would see the options of "Title" and the "Address"
- Title would be the Name of your Blog & Address would be the URL/Link to your Blog.

- Fill the details and click on create
- That’s it now you have created your own blog for free

Tools in Blogger:
- After creating your blog you can see some options like overview, posts, comments and some more just like below screen capture.

- Overview All of the Latest Information of your Blog
- Posts All of your Blog's Posts
- Pages Your Blog's Pages
- Comments All of the comments published on your Blog's Posts or Pages
- Google+ Your Google Account and other Google Information
- Stats Your Blog's Statistics
- Campaign You can give adds of your Blog and google will show these adds on other blogs and you can get much traffic from this
- Earnings This is the Page where you can earn Money by giving adds on your blog. You can Earn Money from Google Through Adsense ( Google Product) .Adsense will be enabled on your Blog when your Blog has about 2000-3000 visitors.
- Layout This is where you can add, edit and remove your blog's widgets
- Template You can design your blog's template here. You can also upload a template to your blog.
- Settings This is where all the settings of your blog are.
See the full tutorial : Tutorial 1
Adding a Template to your Blog
- First of all Download our Premium Template from the Link Below.
Download - Or See a Demo of our Premium Template
Demo - After Downloading, Extract it and then go to Blogger.com and sign in with your Google Account.
- From the Navigation Menu, Go to Template.

- Then Click on Backup/Restore from Top Right.

- You will see a Pop-up like below. Just click on Choose File.

- Then you have to locate the template file which you downloaded from the first step.
- After Choosing the File, Click on upload and wait for some time for the template to be uploaded.
- After uploading, Just click on View Blog on the top and you will see your blog's theme being updated.
See the full tutorial : Tutorial 2
Writing a post in your blog:
Once you've signed in to Blogger, you'll see your dashboard with your list of blogs. Open one of your blog and Here's what you need to do:
- Click the orange pencil icon to write a new post, and enter anything you want to share with the world.
-
Next, you'll see the Post Editor page. Start by giving your post a title (optional), then enter the post itself:
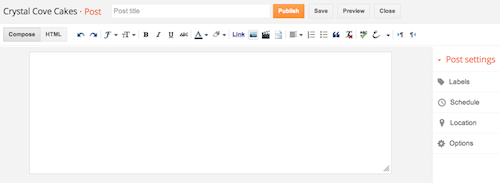
-
When you're done, click the Preview button at the top to make sure it's ready to go, and then click the Publish button to publish your post.
If you want to add Widgets/Plugins in your blogger blog then you can also add them with a single click of a mouse.
See the full tutorial : Tutorial 3
Once you've signed in to Blogger, you'll see your dashboard with your list of blogs. Open one of your blog and Here's what you need to do:
- Click the orange pencil icon to write a new post, and enter anything you want to share with the world.
- Next, you'll see the Post Editor page. Start by giving your post a title (optional), then enter the post itself:
- When you're done, click the Preview button at the top to make sure it's ready to go, and then click the Publish button to publish your post.
Adding Widget for Blogger
After lots of theory, it is my duty to take you guys to the practical work. You can go through the below elaborated steps and can have the solution of your most basic query.
- First of all, you are supposed to go to Blogger >> Sign In there >> Select your Blog
- Then from the side menu select Layout

- Now, you will see different elements on the page. Let me elaborate it more, then you will be seeing a big box which will be referring the Blog posts, a Sidebar elements, header and a footer.

- Now, wherever you want to add widget for blogger, you have to Click on Add a Gadget text on your favorite position or simply click on any of the Add a Gadget button then drag it to your desired position with the help of mouse.
- Afterwards, when you will click on Add a Gadget text, then a new pop-up window will get appear, where you could see default Blogger widgets.

- If you like any widget from that default widgets box then simply click on it and make little changes according to your Blogger template or taste and in last Click on Save

- Additionally, if you have not liked the default blogger widgets, then you can also add the custom widget for blogger, which is available on internet. You have to copy the HTML code of your widget and from the Blogger default widget list, Select HTML/JavaScript

- Then you will see a blank box, leave the title box blank, if you don’t to give any particular title to your widget and in the below content box, paste the HTML code of your custom widget for blogger.

- In last Click on Save
- Congratulations! the Widget for Blogger has been added
See the full tutorial : Tutorial 4
Additionally, there are many Blog Settings available in blogger like Blog Title, Description, Privacy, Address, Permissions, Authors, Readers, Listing, Search Engines, Domain, Inviting Authors and much more. One of our Editorial Team's Member had made an awesome and simple video for all of these settings in blogger. You can see this video from Here : Blogger Settings Video Tutorial
A Domain is a Blog's URL or Address and It seems quite intresting when its free. You can Register a Free .co.vu Domain. And One of Our Editorial Team's Member had also made an awesome video tutorial for "How to Register a free .co.vu domain for your blogger blog". You can See this Video from Here : How to Register a Free .co.vu Domain
SEO ( Search Engine Optimization ) Always plays the most important role in monetizing a blog. SEO helps you to get ranking and visibility of your blog or website in Search engines.
I Saw many of new bloggers gets scared hearing the word SEO. Even i don’t know SEO when i started blogging. Later on I learned it quite well. Its easy if you concentrate on it.
I always believe that Nothing is Impossible..!!!!!
The Best ways to Get Traffic for your Blog is using SEO properly.There are many SEO Tips and Tricks. SEO is divided into two categories, Onpage SEO and Offpage SEO.
After lots of theory, it is my duty to take you guys to the practical work. You can go through the below elaborated steps and can have the solution of your most basic query.
- First of all, you are supposed to go to Blogger >> Sign In there >> Select your Blog
- Then from the side menu select Layout
- Now, you will see different elements on the page. Let me elaborate it more, then you will be seeing a big box which will be referring the Blog posts, a Sidebar elements, header and a footer.
- Now, wherever you want to add widget for blogger, you have to Click on Add a Gadget text on your favorite position or simply click on any of the Add a Gadget button then drag it to your desired position with the help of mouse.
- Afterwards, when you will click on Add a Gadget text, then a new pop-up window will get appear, where you could see default Blogger widgets.
- If you like any widget from that default widgets box then simply click on it and make little changes according to your Blogger template or taste and in last Click on Save
- Additionally, if you have not liked the default blogger widgets, then you can also add the custom widget for blogger, which is available on internet. You have to copy the HTML code of your widget and from the Blogger default widget list, Select HTML/JavaScript
- Then you will see a blank box, leave the title box blank, if you don’t to give any particular title to your widget and in the below content box, paste the HTML code of your custom widget for blogger.
- In last Click on Save
- Congratulations! the Widget for Blogger has been added
See the full tutorial : Tutorial 4Additionally, there are many Blog Settings available in blogger like Blog Title, Description, Privacy, Address, Permissions, Authors, Readers, Listing, Search Engines, Domain, Inviting Authors and much more. One of our Editorial Team's Member had made an awesome and simple video for all of these settings in blogger. You can see this video from Here : Blogger Settings Video Tutorial
Onpage SEO: In simple words its the tips that you should follow while writing your article, publishing them or promoting them. Onpage SEO is all in your control. Well as it beginning guide i am not going into deep discussion about it. Later we will publish articles on Onpage and Offpage SEO.
Offpage SEO: Offpage is something that you have less control over. Its building your blog authority by getting backlinks form other blogs. As you are new beginner first concentrate on Onpage SEO tips to get good results, then later on go for Offpage SEO.
If you are having a blog that is under a heap of content, Then Archive can be proven useful for you. It Prevents your blog to get rusted and connects your readers to your recent as well as previous posts.
See the full tutorial : Tutorial 7
How to Create an Archive in Blogger
In order to get an archive, you do not have to suffer much. Creating an archive is just a piece of cake. All you have to do is to follow these steps:
- Go to Blogger >> Layout
- Select "Add a Gadget".
- Now from the list of different gadgets select "Archive".
- Save the gadget and you're done.

See the full tutorial : Tutorial 8
Adding a Favicon ( Favourite Icon ) to your blogger blog is indeed critical for its individuality. The favicon of a blog is just like your photo on your ID card. We have written a quite impressive and simple steps tutorial on Adding a favicon to your blogger blog. See it From Here : How to add a Favicon to your Blogger Blog
Labels are known as blog categories. For Example services, about us, contact us pages that you add in your menu tab. So that users can contact you and see your services. Label is something like that. It shows several post of related posts of any post you have opened. See a Wide tutorial for that on our Blog : What are Labels and How to Add them in Blogger
You can also add a custom Robots.txt file for SEO. See a Quite Impressive Tutorial about that on our blog : Add a Custom Robot.txt file
Conclusion
This is the complete Overview of Blogger Course from our Site and This is also the Last Lesson of our Blogger Course. But don't worry, Its not the end of blogger here, We shall be posting Blogger Tutorials on our Website for sure.
In last, if you have found this, Blogger Course Helpful, then do not forget to share it with your friends or newbies in blogging to help them as well. You can anytime go to the Blogger Course Learning Center by this Link : bit.ly/websitewithblogger. Please do share this course with others because Blogging is all about helping each other.
Written by Syed Musa Raza Naqvi
We are Creative Blogger Theme Wavers which provides user friendly, effective and easy to use themes. Each support has free and providing HD support screen casting.
 About
About Tags
Tags Popular


Do you know what is the best way to create an outline for persuasive essay? Check this https://persuasivepapers.com/persuasive-essay-outline/ for more.
ReplyDeletealaska airlines Reservations
ReplyDeleteallegiant airlines Reservations
emirates airlines Reservations
hawaiian airlines Reservations
jetblue-airlines-customer-service
jetblue airways reservations
klm airlines reservations
lufthansa airlines reservations
qatar airways reservations
spirit airlines reservations
turkish airlines reservations
delta airlines customer service
united airlines reservations
air canada reservations